Resize User-provided Images with Cloudflare Images
Welcome back to another article! Let's end the year with one last dad joke:
My boss asked me why I only get sick on work days.

I said it must be my weekend immune system.
Alrighty! Let's dive into today's topic: How to resize and host user-provided images with Cloudflare Images.
The Problem
For my startup Indie Courses, I recently ran into the issue that I had to handle user-provided images. In particular, I wanted to resize their images to fit the aspect ratio and size in which I display them. Otherwise, a user could upload a 2MB file with 10000x10000px although I'd display it only in 200x200px.
First, I wanted to require the user to provide their video course assets like cover and thumbnail images in a predefined aspect ratio and size. But that would have been bad UX and I believe strongly that software should handle such transformation.
The Solution
I didn't want to resize the images myself, so I looked into third-party services that allow me to resize and host the images. I'm a long-time customer of Cloudflare and was excited to see that they offer Cloudflare Images now. It lets you upload and resize your images in a multitude of variants for free! You only pay per image, not per size variant. So, I had a solution, I just needed to implement it.
The Code
The code was almost straightforward since it required a single API call to Cloudflare to upload and resize the images. Cloudflare returns a list of URLs for the image, with one URL per variant. We can then choose the variant we want to use for the image.
The Uploader
First, we need to upload the image to Cloudflare. Here's the uploader code:
defmodule MyApp.Storage.Services.UploadImage do

  require Logger

  def upload(filename, byte_content, requested_sizes) do
    # Build the Multipart payload
    file = Multipart.Part.file_content_field(filename, byte_content, :file, filename: filename)
    multipart = Multipart.new() |> Multipart.add_part(file)

    # Build the headers
    content_length = Multipart.content_length(multipart)
    content_type = Multipart.content_type(multipart, "multipart/form-data")

    headers = [
      {"authorization", "Bearer #{bearer_token()}"},
      {"Content-Type", content_type},
      {"Content-Length", to_string(content_length)}
    ]

    # Make the request
    Req.post(
      url(),
      headers: headers,
      body: Multipart.body_stream(multipart)
    )
    |> handle_result(requested_sizes)
  end

  defp handle_result({:ok, %Req.Response{status: 200, body: body}}, requested_sizes) do
    %{"result" => %{"variants" => variants}} = body

    # Map the requested sizes to the returned variants
    size_to_variant_map =
      requested_sizes
      |> Enum.map(fn size ->
        variant = Enum.find(variants, fn variant -> String.contains?(variant, size) end)
        {size, variant}
      end)
      |> Map.new()

    {:ok, size_to_variant_map}
  end

  defp handle_result({:error, %Req.Response{status: status, body: body}}, _requested_sizes) do
    Logger.error("Image Upload failed with #{status}: #{inspect(body)}")
    {:error, body}
  end

  defp url(), do: "https://api.cloudflare.com/client/v4/accounts/#{account_id()}/images/v1"
  defp account_id(), do: Application.get_env(:my_app, :cloudflare_account_id)
  defp bearer_token(), do: Application.get_env(:my_app, :cloudflare_api_token)
end
Making the request isn't terribly difficult, but unfortunately, my HTTP client Req made it a bit harder than necessary. Req doesn't support sending multipart payloads. Luckily, Samrat Man Singh wrote a wonderful blog post about how to use the Multipart library as a workaround. Thank you, Samrat! So, now that we can make the request, let's discuss how I handle the response.
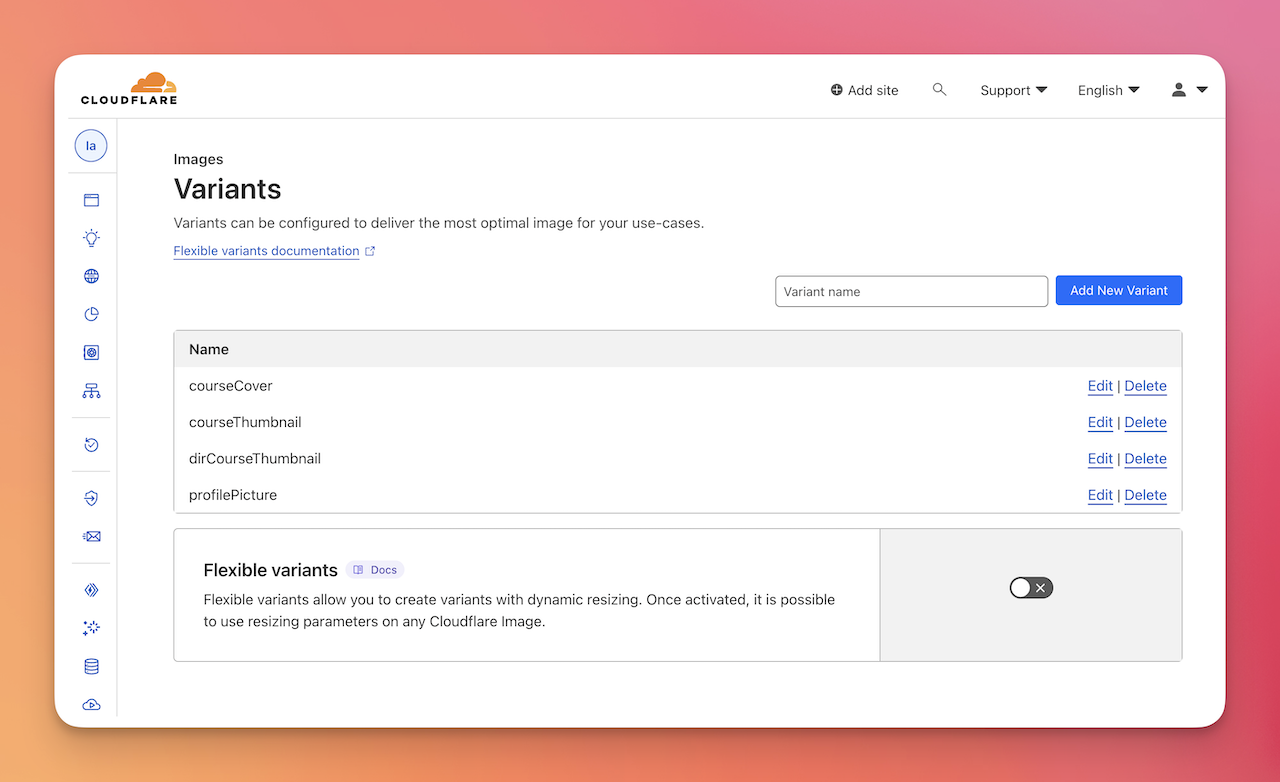
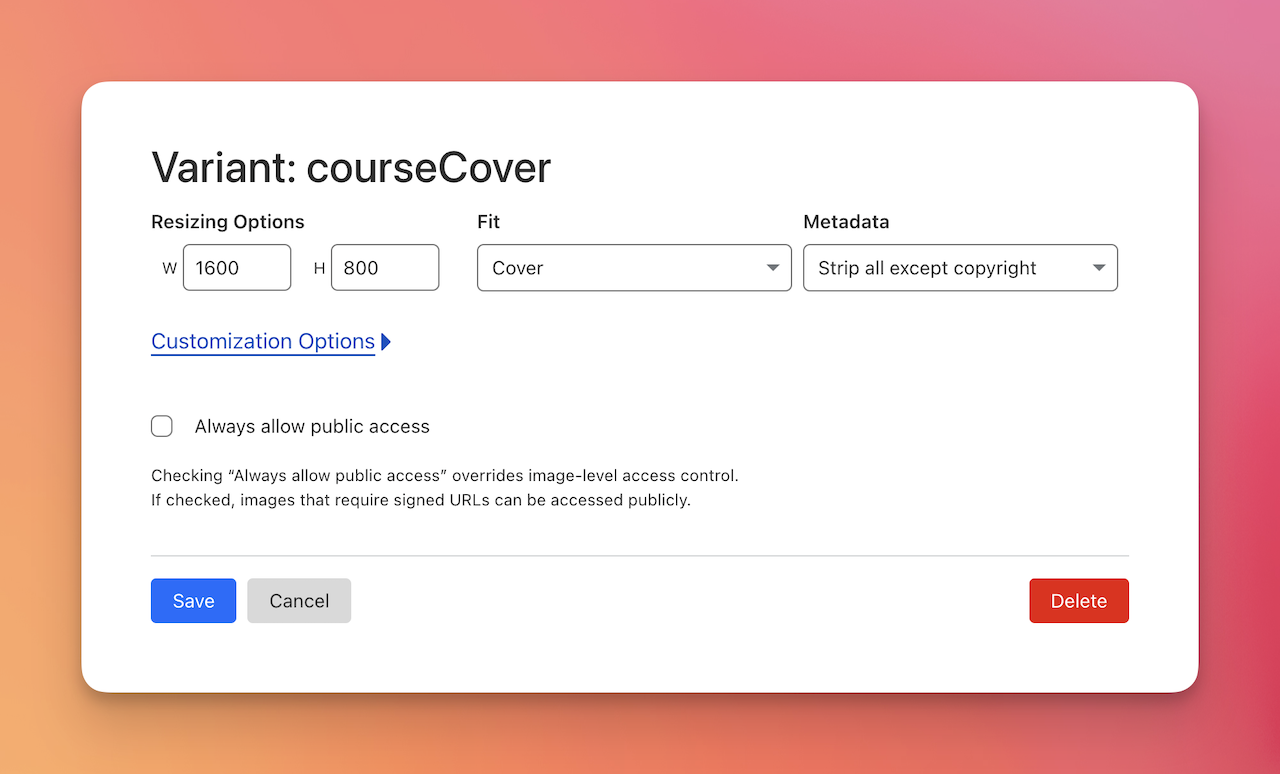
When you upload the image, Cloudflare immediately resizes it and sends you back a list of URLs, one for each variant that you've set up through the Cloudflare Image dashboard. I've set up the following variants in Cloudflare. Note that I haven't named them in pixel sizes (e.g. 1600x900) but rather where I use them (e.g. courseThumbnail). That way, I can easily change the size of e.g. the course thumbnail in the future by editing the variant on Cloudflare. Cloudflare will then resize the variant for all existing images, so I don't have to update any image URLs in my database.

I've set every variant to exactly the pixel size in which I display the images on my website (sometimes a bit bigger just in case). I used the cover fit option because that distorted the image the least. A cool privacy feature you get for free is that Cloudflare strips all image metadata. So, your user doesn't leak any private information e.g. location to the internet. I leave the copyright data, just in case.

Now you understand why I filter the variant-list in the response in the code above. When I upload e.g. a course cover image, I don't need all the other variants except for the courseCover one. So, I ignore them and only return the URL to that variant.
The URL returned by Cloudflare looks something like this:
https://imagedelivery.net/{account_id}/{image_id}/courseCover
If I need a different variant in the future, I can simply replace the variant suffix in the URL.
The LiveView
My LiveView integration of the file upload is very close to the example code in the documentation. However, I like to auto-upload the images (unless the file is part of a form, then not). Here's the LiveView code:
defmodule MyAppWeb.UploadLive do
  use MyAppWeb, :live_view

  alias MyApp.Courses
  alias MyApp.Storage.Services.UploadImage

  def render(assigns) do
    ~H"""
    <div>
      <.live_file_input upload={@uploads.cover} />
      <img src={@course.cover_url} />
    </div>
    """
  end

  def mount(%{"id" => course_id}, _session, socket) do
    socket =
      socket
      |> assign(:course, Courses.get!(course_id))
      |> allow_upload(:cover,
        # Allow any image type.
        # Cloudflare can handle almost all of them I think.
        accept: ~w(image/*),
        max_file_size: 2_056_392 # 2 MB,
        auto_upload: true,
        progress: &handle_progress/3
      )
  end

  defp handle_progress(_image_key, entry, socket) do
    if entry.done? do
      size_variant = "courseCover"

      [%{^size_variant => resource_url}] =
        consume_uploaded_entries(socket, :cover, fn %{path: path}, entry ->
          byte_content = File.read!(path)
          UploadImage.call(entry.client_name, byte_content, [size_variant])
        end)

      course = socket.assigns.course
      {:ok, course} = Courses.update_course(course, %{"cover_url" => resource_url})

      {:noreply, assign(socket, course: course)}
    else
      {:noreply, socket}
    end
  end
end
Conclusion
And that's it! I hope you enjoyed this article! If you want to support me, you can buy my book or video course. Follow me on BlueSky or subscribe to my newsletter below if you want to get notified when I publish the next blog post. Until the next time! Cheerio 👋